TRAINING LEAD-UP
Sunday, Nov 5:
Flew back out to Iowa
Monday, Nov 6:
18A "Lower Body Prep" in 22:01, then "Lower Push BW" in 37:04, then 2 min dead hang with a wider grip, at 5am
Tuesday, Nov 7:
18A "Dynamic Warmup" in 33:59, "Plank Series" in 22:45, both of which felt harder than they normally do. Then "Hollow" in 18 min.
Wednesday, Nov 8:
Found a "lucky dollar" on the ground in the parking lot of a hotel
SUC 2023
Friday, Nov 10:
It was an early morning for me as I woke up at 3am to make a 1.5 hour drive from Iowa to Nebraska, to fly to CLT, and then I drove 2 hours down to Clinton House for the 2-day match.
I missed the opportunity to zero, but I felt ok about my gun with the recent trip to Coleman's. My gun had sped up, but I know that now.
I checked in and met with SB, SW, and CA to read through the match brief and make plans for how we'd approach Saturday's stages.
Unlike last year, there weren't special caliber requirements for primary vs secondary shooter this year, and they might've listened to feedback from last year about giving both shooters opportunities to shoot, instead of having it so heavily lean towards primary.
Saturday, Nov 11:
It was rainy, so we'd get a chance to practice shooting under adverse conditions.

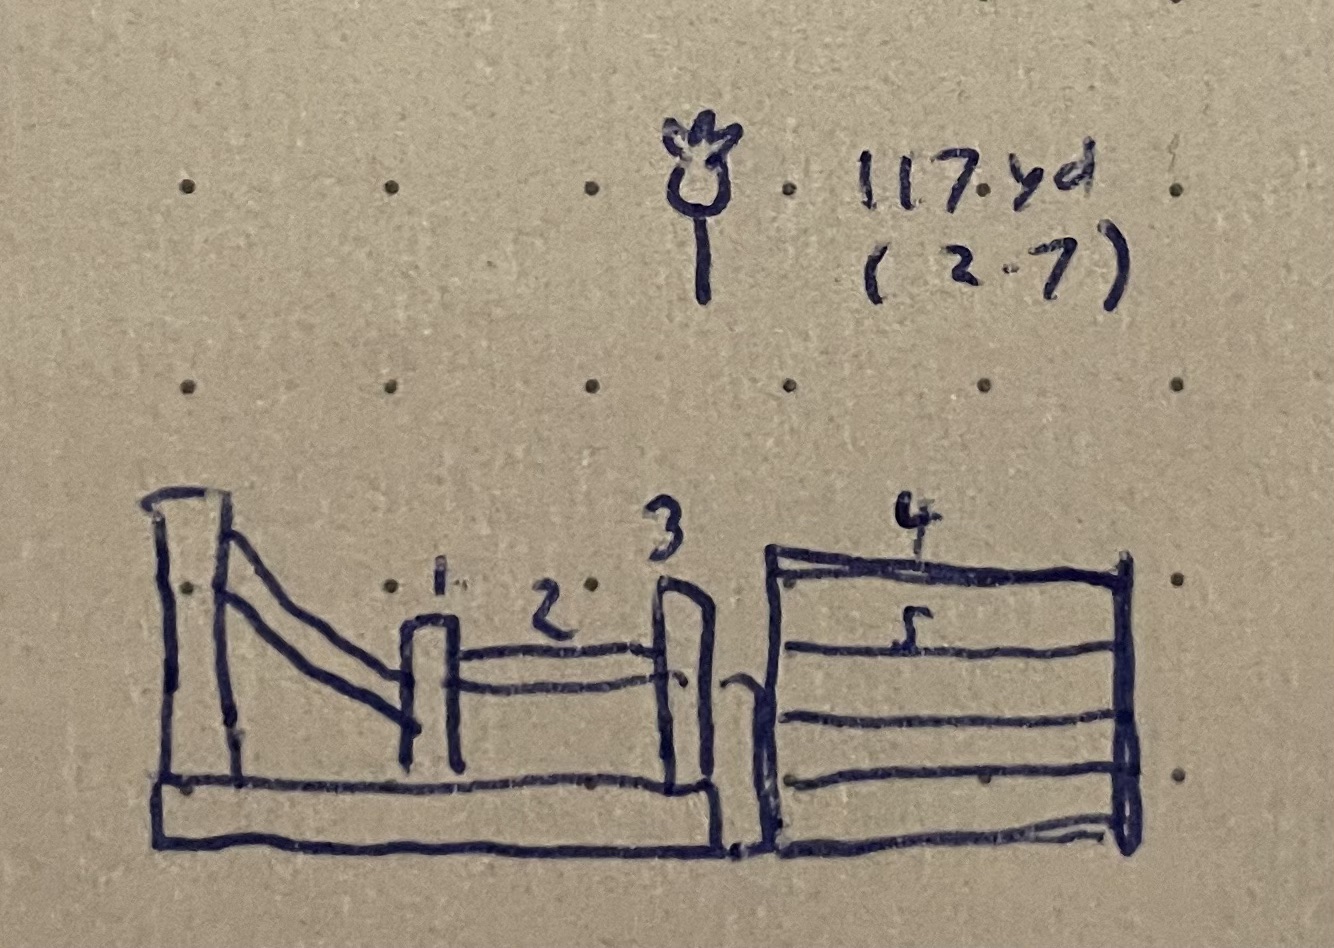
Stage 4: Call for Fire
- Go up stairs and shoot at 2 pistol targets (which ended up being Marathon mover targets), hitting 2x per target
- For bonus points, range estimate an orange target using your eyes only, giving an estimate within 15s. You must be within 5% of the actual range to earn the points.
- Shoot at 4 different targets from 4 marked windows inside the connex, based on the picture of the target shown above each window. Make 2 hits per targets, where you must hit to move on to the next window and target.
- At some point, a HVI wearing an orange shirt may be available to shoot, and doing so is worth 3 bonus points.
Results: 6/11 pts
- There was a technical issue with the robot laptop before our turn, so we had a delay before we got to start. We were last to go, so the other teams went on to the next stage, which required quite a bit of a drive to get to anyways.
- The mover pistol robot rushed on our position quickly, which was surprising and cool to experience. I shot at it 3x to make it go down. Going into it, SB and I had planned to split the two targets, with me going for the left one and SB going for the right one. That kind of went out the window when the guy rushed since I had gone up the stairs first, although it may have been the left one anyways.
- SB had zeroed at that range the previous day and knew the lay of the land better than I did. It was a new bay that I had never been to before. As a result, she estimated the range (at 500yd), and she was close, but didn't get credit for it.
- The targets downrange were indicated by paper signs with images supposedly matching the ones above the windows that we shot from. It was hard to tell, though, because the targets and the signs were very far away. Even with my 35x glass, I had a hard time with some of the signs. SB noticed the large features of the guys pictured in our targets, though. She talked me onto a target, I trusted her, and shot at it. It took 3 rounds to make 2 hits, but at least we got something!
- The next window was tall, so I asked SB to take over with shooting. We timed out on the 5 min PAR time before earning any points there, though.
- The targets on this range were way to the left of where one would naturally check, looking out the window. I don't think I've encountered that much of an angle before. That'll be something to keep in mind for future stages.
- We never actively looked for or saw the HVI, which is ok... if you did search too much, you could waste valuable time
Stage 5: Hostage
- Move to the shooting area and hit 2 pistol targets, 2x each. They were close but very small.
- Shoot the hostage taker before the 75s PAR time of the stage is over, or else you get a zero for the stage. If you miss, though, you lose 50% of whatever points you have left, and you can make multiple attempts, but you'd potentially get multiple misses and compound your losses. A single miss automatically takes you down from the 4 you started with after engaging pistol, down to 2, so making a first round hit essentially gets you 8 points over anything else, which is huge.
- If you shoot the hostage (a baby), that's also an automatic 0 for the stage.
Results: 2/10 pts
- Since we got to the stage after everyone else had started, we got a 1-on-1 brief, but the RO re-hashed questions that the other participants asked, so that we didn't lose out on any info.
- During the brief, when we found out that the targets would be movers, we changed our original plan and had me shoot pistol while SB ranged, since I wanted to give her more time to locate the hostage. The movers ended up being in a concentrated area, so at least panning wasn't required, but they did turn their backs and go left and right and all around.
- In the rush to get caught up with the stage, I only loaded my rifle mag and hadn't loaded my pistol mag, which reinforces why you should always load secondary first. I lost time on pistol because I had to load on the clock. To make things worse, I kept missing, and once I was missing enough, I asked SB to help me with the pistol targets.
- Once pistol was done, we didn't have much time left, since I had eaten up so much of it. We had about 15s left, so I got down on the ground, saw the target, and sent a round at it. I was rushing, so it wasn't a 100% shot, but it wasn't a bad shot. I had to aim for the head, since the baby was being held at torso level. Unfortunately, it didn't hit.
- I did end up having a little more time, so I could've taken another shot if I wanted to, but I decided to keep the 2 points that we had, instead of risking it and potentially missing again and taking us down to 1 point, especially if my first try had already missed.
Stage 1: EMP
- Shoot at 6 targets on a troop line, but you're only given the ranges for the 5th (900) and 6th (1300) targets up-front. You have to figure out the distance of the other targets yourself, but you aren't allowed to use any LRFs or even phones (although I don't see how a phone would help, other than the calculator). They wanted to really mimic an EMP.
- Once you make 2 attempts per target, working N->F, if your 5 min PAR time hasn't run out yet, you can do a "resupply" where one person gets off the platform and does a little shuttle run for 2 jerry cans.
- Once the runner is back, you can re-engage the 6 targets the same way (2 attempts each, N->F) as many times as you can for points, until time's up. This means that this is technically an infinite point stage. At this match, a point ended up being worth a point, no matter what stage it came from, so this stage had a huge weighting potential.
Results: 0/12 pts (without resupply)
- The night before, SB and I had created milling charts for the target sizes that were given on the UKD targets, for a wide range of mil measurements and target ranges. I like the formula for precision, but with no phones allowed for calculators, charts would be a decent substitute.
- I should've studied my reticle prior, since it ended up being more complicated than I had remembered.
- I measured and SB looked up the chart results, but I was missing a lot (like a mil). I'd make a correction, but it would still be off... it's hard to make corrections based on misses when there's not a berm, since the round may continue to fly for quite a ways and change in elevation before hitting ground.
- We timed out at around target 4 or 5, because SB ended up using the wrong row in the chart by accident.
- SB did have a spotting scope which had a reticle, with which she was able to confirm some of my mil estimates.
- I was glad that at least we figured out what had happened afterwards, so we knew it wasn't my scope or gun that had gotten messed up, since that's harder to fix mid-competition.
Stage 2: The Villages
- Use the previously published target package with images of 5 HVIs to PID and engage each target with a simulshot. You only get 1 attempt per target.
- We each had tripods, but when I squatted down and saw that all of the targets were visible from prone, I went prone.
- The targets ended up being not steel, but pieces of paper, each with 6 pictures on it, and we were to shoot the pieces of paper. That's different!
- You only get credit for a hit if both team members hit the target, within 1s of each other.
Results: 1/10 pts (without resupply)
- We counted down from 4 and shot on the 1.
- We didn't bother to range the berms, which hurt us a little bit because we found out afterwards that one of the berms that we were shooting at was actually at 250 from where we were, not 200 like we had guessed based on it being the second set of berms on the 300yd range. That range difference at that range is enough to make you almost miss, when the target is as small as it is (3-in).
- The images were small, so we had to look closely to figure out which ones were the targets. It was doable with the 35x glass, though.
- We attempted shots on 2 targets before the 5 min PAR time ran out, but only scored on 1. The most that any team made was 2! I wonder what tripped up the other teams... if it was target ID, or simulshooting, or misses due to ranging issues or fundamentals.
- I noticed mid-stage that there were rounds on one of the plastic sheets holding the paper, which is a giveaway, but the holes are really hard to see.
- It had taken me a moment to realize that we needed to shoot at the pictures themselves, since we're so used to shooting on steel and wanting to avoid being sucked into shooting the pictures themselves.
- Note: non-permanent Lumocolor markers don't survive in the rain! Fortunately, the act of drawing the characters helped me memorize the characters' images.
Stage 3: Chaos Bus
- Go into the bus and find pictures of each numbered target, spread around the bus.
- Shooter 1 must shoot targets 1-4 with 2 hits each, in number sequence.
- Shooter 2 shoots targets 5-8 with 2 hits each in number sequence.
- There is a yellow shirt HVI worth 3 bonus points.
Results: 4/16 pts
- Before the stage, while we were in the holding area, we surveyed the range and gave formal names to different features, to make the talk-ons easier later.
- There were a ton of targets in play... some had numbers, some had symbols, some had faces. Some were closer, some were farther. Lots of chaos.
- Oh yeah, there were pig noises blaring on a speaker the whole time, making comms a bit more challenging.
- The targets' pictures were truly scattered all over the bus, in some tricky places... very clever and fun.
- Once we found the picture labeled #1, both of us needed to see it, since we both needed to find it so that SB could range it and I could find it to shoot it.
- SB was trying to talk me onto the first target that she spotted out in the field, when I happened to notice the HVI, which was nearby, so I went for it. I shot 3x at it, and it did go down, but it turned out that it went down because it was "going away", not because I had killed it.
- We went back on track afterwards, and I hit the first target 2x.
- SB found the next image in the bus, I found it out in the field and talked her on so that she could range it, and I shot it. Nice.
- We found the third target but ran out of time on the 5 min PAR stage before I could try shooting.
- This was such a fun stage, and we felt good leaving, since I thought I had gotten the HVI in addition to hitting 2 targets.
Dinner
That was the last daytime stage of the day. We'd be back at night for 2 night stages.
Before then, we got a nice dinner at Blue Ocean Seafood Restaurant. It looked like a random place from the side of the highway, but it was huge and packed inside. They had an impressive menu, and the food was good.
We then took a little time to plan for the night stages and plan for the next day's stages, so that we wouldn't have to stay up super late after shooting to do the planning. We had enough time afterwards to lay down for about 30 min.
Stage 7: Lights Out
- From the car, shoot at 2 pistol targets with 2 hits each
- Exit the car, holster, and run to the next bay over.
- At each of 3 barrels, shoot whatever movers appear ahead. They need to be vital hits to go down. Holster when you move from one barrel to another.
Results: 4/16 pts
- This stage went well for us (and probably for almost every team, since the 2 min PAR time was generous for the course of fire, and the shots weren't crazy hard), but because the score tracking sheets were destroyed in the rain, they threw out the stage from the match later on
- On the movers, we did have to shoot extra to get the vital hits, but it wasn't too bad.
- The robots growled, and it was dark and rainy, so the experience was cool.
- My red dot was very dim during the first barrel, so I tried to figure that out... maybe auto-brightness failed me... it seems like max brightness is always good and can never hurt. It's never been too bright for me, at least with white light / day time scenarios. It did get better from the second and third positions, so I'm guessing it's an issue with auto-brightness.
Stage 6: [REMOVED]
- This night stage was killed before we even started, because when the first squad was going, the suppressors were glowing hot after much of their squad had mag dumped 30rd pp in 2 min.
- They ended up just letting whoever wanted to, shoot at the movers, who they brought in closer. It was great having free time with the movers. I wish that I had brought more ammo to the night portion to play with, instead of only bringing what I needed for the night stages!
- It would've been fun to do this with my NV stuff, too, oh well.
Sunday, Nov 12:
Stage 9: Boat
- At the top of the hill, shoot the "guard" steel with pistol, then run down the hill and get into the boat.
- Shoot 5 rifle targets from the boat, across the lake, with 2 hits each, calling your targets beforehand.
- Return to the bank before the 5 min PAR time ends to bank the points, or else you'll get a zero for the stage.
Results: 9/11 pts
- While 2 people could technically shoot and while we brought 2 guns, we only used a single shooter with gas gun for this stage, to minimize extra movements when stability was going to be challenging enough.
- I saw some targets, ranged, and talked SB on. I maneuvered the boat to the left and right using the rope overhead, to help her see the targets through the trees. I had to move the boat slowly, since it would eventually over-correct.
- SB used the ambush technique as the boat slowly moved, and crushed her hits.
- SB found the next 2 targets and was working on hit #2 on target #4 when our 4 min alarm went off, signaling that we should start getting back to not risk timing out before earning points. She felt really close, though, so she continued to get the last hit before we rushed back.
- We must've looked hilarious tripping over ourselves trying to get ourselves and our gear out of the boat, and dragging the boat onshore.
- This must have been a hilarious stage to RO.
Stage 10: Stacks
- Run to the first position and shoot the plate rack (both shooters can shoot at the same time)
- Run to the second position and shoot at the mover rifle target (2 nonvital or 1 vital hit)
- Run to the third position and shoot 2 steel 2x each, before shooting an unknown number of estimated 3-5 rifle targets.
Results: 18/18 pts
- I was terrible at pistol. I needed to slow down and control the trigger squeeze and flinch.
- SB crushed it on the first mover, which I had ranged at 150yd through the trees in a gap. She's better at movers, so she shot there.
- On the third section's pistol shots, I had trouble hitting even the giant steel targets, and started asking for help but eventually got them, as SB set up her rifle position on tripod. The MD was nice enough to let us know in the brief that tripods would be useful. They were necessary, since our shooting position was blocked by a barricade, so you needed some height to see and shoot the targets. Even with the tripod, there was still a lot of vegetation to deal with, so the targets weren't always visible, depending on where they had moved.
- The movers were migrating around a particular area, so I chose to laze the middle of where they were congregating, since they seemed close enough to each other... it was about 350, although some were as far as 4XX, and some were as close as 2XX, supposedly. I was trying to use shortcuts, which we don't do enough sometimes to save time. Movers are tall, but it's possible that multiple ranges would've been good to take... a max and a min.
- I think most teams ended up clearing this stage, so points-wise, it was a wash.
Stage 8: Ian
- Run into the forest to the clearing and shoot at 2 pistol targets with 2 hits each
- Go into the "helicopter" (a non-moving one, fortunately) and shoot 1 mover pistol target
- Then, shoot various movers with rifle
- At some point, an S-Vest mover will appear, and you must take him down before he gets a certain distance from you, or else you get get zero points
Results: 14/14 pts
- We wanted to mitigate the risks of getting a zero, and we had no idea where the S-Vest would come from or how quickly it would be moving and how much time we'd have to down it before it got to us, so we decided that my job would be to solely focus on looking for the S-vest, while SB took on the movers. SB even handled the helicopter pistol shot, so that I could prep my rifle to shoot ASAP.
- I saw the "finish line" that the S-Vest would likely be going towards and called it out. SB spotted the S-vest, so I aimed there and hit him in 1 shot, which was quick and awesome.
- Afterwards, we both went for the farther movers, and with the gas gun, I was able to get quite a few with sheer volume and speed.
Overall:
- We placed 30/37th, which is better than the third-to-last that we got the previous year in a larger field. We were happy with it, and if the Hostage stage and/or the EMP stage had gone our way, we would've been much higher in the rankings
- It was fun to get to apply more strategy in deciding who shot what this year, instead of having it be a primary-dominant competition
- Our increased experience resulted in better strategy